
* In the mid-1930s, Britain began programs to develop heavy bombers, with three four-engine bombers -- the Short Stirling, the Handley-Page Halifax, and the Avro Lancaster -- emerging in World War II. The Lancaster would prove the most famous of the three, but the Stirling would have the distinction of being the first of them to enter service, and would have a combat history of distinction. This document provides a history and description of the Short Stirling.
* In 1935, the British Air Ministry issued a request designated "B.1/35", specifying a new twin-engine bomber for the Royal Air Force (RAF). A number of manufacturers submitted proposals, with the Vickers firm being awarded the contract for what would emerge as the "Warwick" some years later, the Warwick leading to the smaller "Wellington". Handley-Page had submitted a design with the company designation of "HP 55" for B.1/35, but the next year, 1936, the Air Ministry issued two new requests for bombers, "B.12/36" and "B.13/36", leading to changes in company plans.
The B.13/36 requirement would lead, somewhat indirectly, to the Avro Lancaster and Handley-Page Halifax. As for the B.12/36 requirement, its specifications were aggressive, with the four-engine bomber to feature:
The spec also set restrictions on the size of airframe subassemblies, to allow them to be easily transported by rail. Proposals were submitted by a number of British aircraft manufacturers, with the Air Ministry being most impressed by the Supermarine design, the "Type 317", with two prototypes being ordered in January 1937. The Air Ministry found the Short Brothers submission, the "S.29", more conservative in design, but for that reason decided to support development of it as a backup plan, suggesting changes to the firm, then ordering prototypes in October 1937.
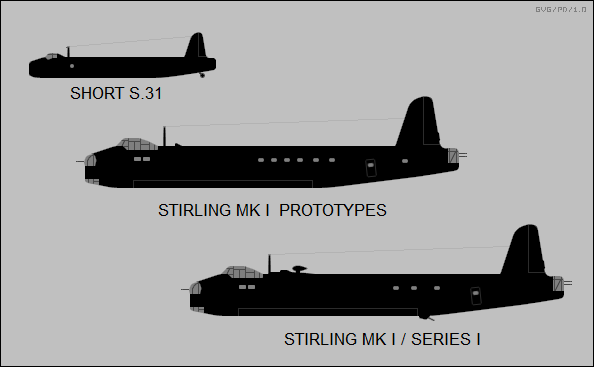
As it turned out, Supermarine would end up preoccupied with building the Spitfire fighter, and the Type 317 would never fly. In the meantime, Short went forward on the S.29, initially building a wooden half-scale version, the "S.31", as a demonstrator. The S.31 was powered by four Pobjoy Niagara III seven-cylinder air-cooled radial engines providing 67 kW (90 HP) each, with seating for a pilot and observer in tandem; length was 13.3 meters (44 feet 8 inches) and span was 15.1 meters (50 feet 6 inches). Photos suggest the main gear was retractable; it is unclear if the tailwheel was.
The S.31 performed its initial flight on 19 September 1938, with Short chief test pilot Lankester Parker at the controls. The demonstrator flew well, though the take-off run was seen as excessive; changing the angle of incidence of the wing would take care of that, but given time constraints, it was simpler to lengthen the main landing gear struts were extended to provide a more "nose up" attitude, and shorten the take-off run. That worked, but it meant problems over the long run with weakened landing gear, and degraded field of view on the ground from the cockpit. The demonstrator was later upgraded to Niagara IV engines with 85 kW (115 HP) each, and used for various trials. It was finally scrapped, following a take-off accident, in early 1944.
* The first prototype S.29, now given the service name "Stirling" after the Scots city of that name, performed its initial flight on 14 May 1939, being powered by four Bristol Hercules II 14-cylinder two-row air-cooled radial engines with 1,025 kW (1,375 HP) each. One of the mainwheel brakes locked up on landing, leading to collapse of the landing gear and the aircraft bellying in on the runway. Nobody was seriously hurt, but the prototype was damaged beyond reasonable repair.
The second prototype flew seven months later, on 3 December 1939, after the outbreak of World War II, leading to the initial flight of the first production "Stirling Mark I" on 7 May 1940, being powered by Hercules XI radials with 1,190 kW (1,595 HP) each. Initial production was from the Short plant at Rochester in England, with the Short & Harland plant in Belfast, Northern Ireland, then beginning production. Further production was initiated in England at the Austin Motors plant in Longbridge and the Rootes plant at Stoke-on-Kent. Ultimately, twenty different plants would turn out Stirlings.
Service deliveries began in August 1940, though production was hampered by the Battle of Britain -- both because of priority being given to fighter production, and because of destruction caused by Luftwaffe raids on Rochester and Belfast during August. The raid on Belfast was a bit of a shock, since it was assumed out of range of German bombers. In spite of the difficulties, Stirlings performed their first operational mission on the night of 10:11 February 1941, with three Stirlings of Bomber Command Number 7 Squadron dropping bombs on oil-storage tanks at Rotterdam in the Netherlands, each aircraft carrying 16 225-kilogram (500-pound) bombs.
BACK_TO_TOP* The Stirling Mark I provides a baseline for the type. The Stirling owed much to Short work on big flying boats. The bomber was a boxy-looking aircraft, with a mid-mounted wing and a conventional tail arrangement, being powered by four Bristol Hercules XI engines driving three-bladed variable-pitch propellers -- apparently some early production machines retained the Hercules II variant used on the prototypes.
The Stirling had taildragger landing gear, all gear assemblies being retractable, each main gear having a single wheel and retracting backward into the inboard engine nacelle -- the bottom of the tires remaining visible after retraction -- and the tailwheel assembly having two wheels. The yoke-type struts for the main gear were very long to give the bomber a high angle of attack for help with short take-offs; as mentioned, the main gear would prove troublesome. The high-perched cockpit added difficulty to take-offs, though the Stirling handled well enough once it got off the ground. However, one of its idiosyncrasies was that the Hercules engines had hydraulic throttle controls, which gave them slow response to throttle input -- not an attractive feature in an emergency. In compensation, the Stirling was sturdy and able to soak up a fair amount of battle damage.
Flight control surfaces were conventional, with a large one-piece flap and an aileron on each wing, plus elevators and rudder on the tail. The wing had twin spars and was thick, being loaded up with fuel tanks: each wing featured four tanks between the spars, two behind the rear spar, and one in the wing leading edge in front of the forward spar. All fuel tanks were self-sealing, except for the wing leading-edge tanks, which were only used for long-range missions, and were emptied first after take-off. Total fixed fuel capacity was 10,247 liters (2,704 US gallons).
The wingspan was less than 100 feet, giving the Stirling high wing loading and limiting its ceiling; on the plus side, the high wing loading made it surprisingly agile for an aircraft of its size, with a good turn rate and a snappy roll rate. There is a tale that the short span wing was due to a requirement that the aircraft fit into hangars -- but that story is disputed, other sources claiming the short span was simply to reduce weight. Enough to say that it had a wingspan that would prove inadequate in significant ways.
The Stirling had a shallow bomb-bay 12.8 meters (42 feet) long, divided into three parallel "cells", each only 48.3 centimeters (19 inches) -- which would prove a limitation as the war went on, since the Stirling would never be able to carry the oversized "high capacity" or "blockbuster" bombs; it couldn't handle general-purpose bombs bigger than 225 kilograms (500 pounds). Along with the main bomb bay, there were bomb-bays in the wings inboard of the main engines, though drawings suggest they were generally used to accommodate long-range tanks. Maximum bomb load was an impressive 6,350 kilograms (14,000 pounds), but that load could only be hauled for a relatively short distance; for long-range missions, the typical bombload was a quarter of that weight, 1,590 kilograms (3,500 pounds).
At the outset, defensive armament consisted of a Frazier-Nash (FN) Mark 5 nose turret, with twin 7.7-millimeter (0.303-caliber) Browning machine guns, and an FN Mark 20A tail turret with four 7.7-millimeter guns. Sources say that early production Stirlings featured a retractable ventral position with two 7.7-millimeter guns, but that it worked poorly and was deleted, with a gun then mounted in a flexible position on each side of the rear fuselage; it is difficult to find specifics on this matter. There was also a Boulton-Paul dorsal turret with twin 7.7-millimeter guns, but photos show that it wasn't fitted to all Stirling Mark Is -- it appears to have been introduced after initial production, once the ventral armament was given up.
The fuselage was built as four separate modules, then bolted together. Crew included a nose gunner; pilot and copilot in the flight deck; navigator, radio operator, and flight engineer in the space behind and below the flight deck, with the navigator doubling as the bombardier, or "bomb aimer" as the RAF called them; plus dorsal gunner and rear gunner. The navigator had an astrodome on the top of the aircraft behind the cockpit and to the right, with a directional antenna to the rear of the astrodome on the centerline. There was an escape hatch on the bottom of the nose; on top of the fuselage, at the rear of the wings; and under the rear fuselage. There was a crew door on the left rear fuselage, set at a skewed angle in reflection of the Stirling's parked attitude.
Spare oxygen bottles were stowed above the wing center section, while illumination flares and flare floats were stowed in the rear fuselage, being dropped out launch tubes next to the rear belly hatch. There was a rest bunk in the space between the wing center section and the bomb bay, a primitive lavatory in the rear, and an inflatable rescue dinghy under a panel in each wing to the rear of the inboard engine. Typical Stirling paint schemes, once the aircraft reached its stride of operations, were disruptive camouflage on top and black on the bottom.
* Although early war British propaganda trumpeted the Stirling as able to carry the war to the Germans "day or night", by the time the Stirling went into operation, RAF Bomber Command raids against Germany were strictly carried out at night, with daylight raids only performed against targets near enough to the UK to permit fighter escort. The British had learned early on in the war that unescorted bombers performing raids in daylight were so vulnerable to enemy fighters that persisting in such would result in the complete annihilation of Bomber Command. The Stirling did participate in "Circus" escorted daylight raids, but it was more heavily committed to the Bomber Command effort to bring the war home to Germany through night raids.
Night operations weren't all that pleasant either, with the German Luftwaffe building up a lethally effective radar-guided night fighter force, primarily based on the Messerschmitt Bf 110, along with the Junkers Ju 88. At the outset, the Stirling could often hold its own against Luftwaffe night fighters, which were loaded down with radar and heavy cannon, ensuring they weren't much faster than the bombers they were trying to shoot down. If the tail gunner of a Stirling spotted a German night fighter trying to sneak up on the bomber, the Stirling pilot could perform a "corkscrew" maneuver that would easily shake the attacker. The tail gunner could of course shoot back as well; the 7.7-millimeter guns didn't have a lot of hitting power, but they could confound attacks by Luftwaffe night fighters -- small bullets or not, nobody likes having a rain of lead thrown in his face -- and did score their kills on occasion.
Stirling production took time to get up to stride, partly due to damage caused by Luftwaffe air raids against the UK, eleven Stirlings being destroyed on the ground before delivery by German bombs. By the end of 1941, roughly 150 Stirlings had been delivered, production being from Short in Belfast and England, and a number of second-source firms in England, most prominently Austin Motors.
There was a plan to produce a "Stirling Mark II" in Canada, to be powered by Wright Cyclone R-2600-A5B nine-cylinder radials with 1,195 kW (1,600 HP) each; two Stirling Mark Is were converted to this configuration, and three pre-production machines were built. The plan fell through, and most or all of these five aircraft were converted to Mark I configuration; the Mark II never entered operational service. A total of 712 Mark Is was produced, not counting the two prototypes and the eleven bombers lost in Luftwaffe bomb raids before delivery, but including the Mark IIs.
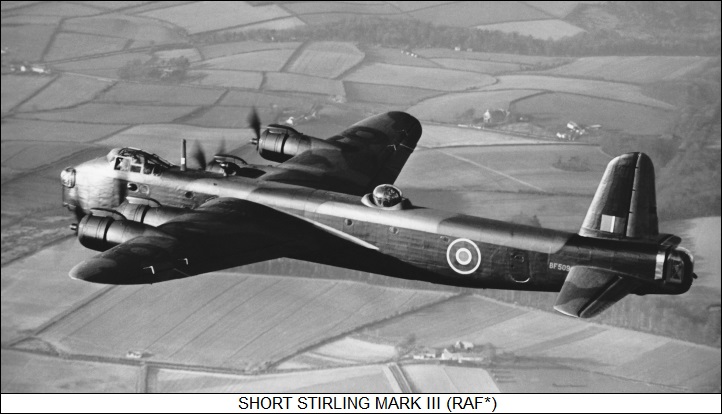
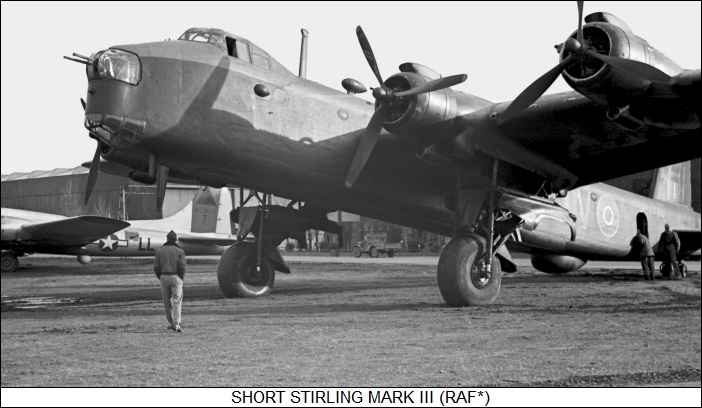
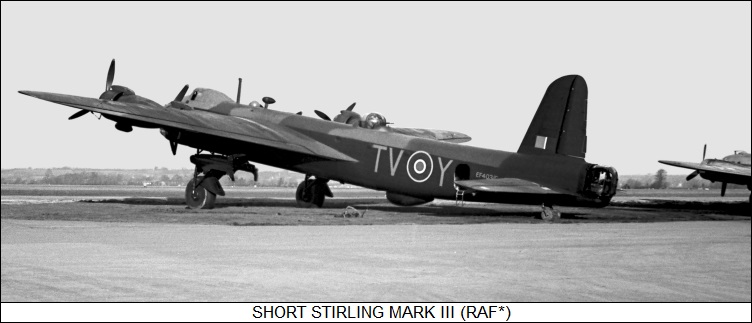
BACK_TO_TOP* Short considered a considerably enhanced Stirling configurations, including the "S.34" and the "S.36 Super Stirling", with features such as a longer-span wing, more powerful engines, and heavier defensive armament. The decision was finally made that there was no sense in refining the Stirling, given that the Avro Lancaster was in production. However, the Stirling was seen as having enough virtues to justify continued production, with a "Stirling Mark III" introduced into production from 1942. The major change was introduction of more powerful Hercules XVI radials with 1,220 kW (1,635 HP) each, in visibly modified engine nacelles featuring more prominent top scoops.
   ___________________________________________________________________

   SHORT STIRLING MARK III:
   ___________________________________________________________________

   wingspan:
     30.2 meters (99 feet 1 inch)
   wing area:
     135.63 sq_meters (1,460 sq_feet)
   length:
     26.59 meters (87 feet 3 inches)
   height:
     6.93 meters (22 feet 9 inches)

   empty weight:
     19,595 kilograms (43,200 pounds)
   MTO weight:
     31,750 kilograms (70,000 pounds)

   max speed at altitude:
     435 KPH (270 MPH / 235 KT)
   service ceiling:
     5,180 meters (17,000 feet)
   range, full bombload:
     950 kilometers (590 MI / 515 NMI)
   range, 1/4 bombload:
     3,235 kilometers (2,010 MI / 1,745 NMI)

   ___________________________________________________________________
The Mark III also featured a low-profile FN Mark 50 dorsal turret with twin 7.7-millimeter guns, as fitted to the Lancaster and some late-production Stirling Mark Is; larger fuel tanks; and a revised interior, with fewer windows on the rear fuselage. By that time, Bomber Command's night offensive against Germany was in full stride, with "thousand bomber raids" pouring bombs onto German cities.
The effectiveness of Britain's bomber war against Germany has been debated, since bombing accuracy was low -- hopelessly low at the outset, though it did improve somewhat over time -- and the Germans proved resilient at dispersing arms production. However, the bombing was certainly disruptive and problematic for German war production, and also forced the Reich to devote considerable military resources to home defense that would have otherwise been used for offensive operations.
Those defenses inflicted considerable pain on Bomber Command, with the two sides engaged in a death race to obtain better measures and countermeasures. One trick the Luftwaffe came up with was to install fixed upward-firing cannon on the back of night fighters, the arrangement being known as "Jazz Music"; the night fighter would sneak up into the bomber's blind spot from below and then hammer it out of the sky. In response, Stirlings acquired a single flexibly-mounted 7.7-millimeter or 12.7-millimeter (0.50-caliber) Browning gun firing out the floor hatch, with the gunner keeping a lookout and hopefully giving pause to the pilot of a night fighter trying to get into position for a kill.
The belly gun appears to have been a field fit. Incidentally, it has been argued that the top turret on RAF bombers was more trouble than it was worth for night combat, providing little defensive utility, while cutting speed through weight and particularly drag. Given that a Luftwaffe night fighter didn't have much of a performance edge on an RAF bomber, the incremental increase in speed of a bomber might have made a significant difference.
Many Mark III bombers were fitted with H2S ground-mapping radar in a belly radome, with some radar-equipped Stirlings operating in the Bomber Command Pathfinder Force, which marked targets for RAF bomber streams by dropping oversized flares to give bombardiers something to aim at.
* A total of 1,047 Stirling Mark III bombers was built, not counting some conversions of Mark Is, making it the most common variant. With the Halifax and Lancaster increasingly bearing the brunt of the night offensive, the Stirling was soon seen as overly vulnerable. It's hard to say the Stirling couldn't take care of itself as well, or given the Stirling's agility better, than the Lancaster, but the Stirling's lower ceiling made it easier for Luftwaffe night fighter to intercept. The inability of the Stirling to carry HC bombs also worked against it, and so the decision was made to drop it from the night offensive.
Stirling bombers took over secondary roles, such as maritime minelaying, a mission quaintly referred to as "Gardening"; or being converted to "radio countermeasures (RCM)" platforms by adding countermeasures gear. RCM Stirlings participated in the elaborate electronic deception effort conducted in support of the Normandy landings in June 1944, helping create "ghost" naval fleets by dropping well-timed bundles of "window" -- what we'd call "chaff" today, though that term had a slightly different meaning in those days -- to deceive German radars. Some were also used for agent drops and parachute supply of British Special Operation Executive covert operations.
BACK_TO_TOP* Despite the removal of the Stirling from the night bomber offensive, it was still seen as useful enough to remain in production, though in the roles of paratroop transport and particularly glider tug, where its ceiling and bombload limitations were inconsequential. Two Mark III bombers were converted to the appropriate "Stirling Mark IV" configuration in 1943, with production deliveries in the last quarter of that year.
The Mark IV's airframe was effectively that of the Mark III, but the nose and dorsal turrets were deleted, with the nose turret replaced by a plexiglas viewing position for the navigator, and the top turret position faired over. The tail turret was also sometimes deleted as well. Glider tug Mark IVs featured tow gear under the tail, being able to pull one big Hamilcar glider or two or more smaller Horsa gliders -- sources claim they could pull five gliders, but that sounds like an accident waiting for a place to happen, a descriptive phrase that could be applied to combat gliders in the first place. In paratroop transport configuration, paratroopers jumped out a hatch in the floor.
A total of 450 Stirling Mark IV machines was built, all at Belfast, with at least 21 Mark IIIs also converted to Mark IV configuration. The Stirling Mark IV participated in the Normandy operation; the ill-fated operation against Arnhem in the Netherlands during September 1944; and the massive airborne operation in support of the Rhine crossings in March 1945.
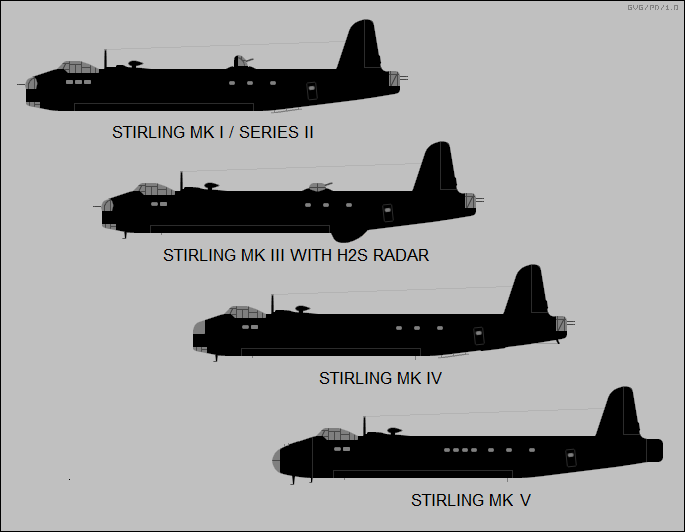
* The Mark IV wasn't the end of the line either, with a "Stirling Mark V" pure transport developed in 1944 and introduced to service in early 1945. The Mark V had no armament; it featured an extended nose -- stretching the length of the aircraft to 27.6 meters (90 feet 7 inches) -- that hinged open, and a large cargo door on the right rear fuselage, which was loaded via ramps that were manually set in place. It could carry 40 passengers; or 20 paratroops; or 12 stretchers plus seating for 14 sitting casualties and attendants; or loads such as two jeeps with trailers, or a jeep with a light field gun. There was further consideration of an "S.37" civil airliner for postwar production, but it didn't happen.
A total of 160 Stirling Mark V transports was built, all by the Belfast plant. The Mark V was intended for service in the Far East, though the abrupt end of the war there in August meant they never served in that role. While the last Stirlings were removed from RAF Transport Command roles in 1946, a dozen Stirlings were converted to an S.37-like airliner configuration and sold to the Belgian operator Trans-Air in 1947, to be used for flights to the Far East for a number of years. They were the only Stirlings formally on charge with a foreign operator, aside from service with British Commonwealth forces under the RAF umbrella. One Stirling force-landed in the Netherlands in August 1942 and was flown for evaluation by the Germans, but it's unclear if it was used in any operational missions by the Luftwaffe.
* The following list gives Stirling variants and production:
That gave total production of 2,371 Stirlings, not counting 11 bombed before delivery.
The Stirling tends to be slighted in aircraft histories as inadequate, but it was an excellent aircraft by the standards of its time, simply being overshadowed by better aircraft that followed it. After all, it was still in production in 1945, which hardly makes it sound like a failure. The Stirling served with a total of eleven bomber squadrons and performed tens of thousands of sorties, with almost a third of them being shot down, damaged in combat beyond repair, or lost in operational accidents. Appallingly, no Stirling survives even as a static display today -- though a group in the UK is trying to rebuild one, or at least parts of one.
BACK_TO_TOP* I was doing an update of my Handley-Page Halifax document and got to thinking that I had enough space to include the Stirling as well. As it always happens, I ended up writing more than I expected about that Halifax, and the Stirling ended up in its own document.
The only formal source for this document was: THE SHORT STIRLING by Geoffrey Norris -- a Profile Publication, not dated but clearly published in the 1960s.
* Revision history:
   v1.0.0 / 01 jul 15
   v1.0.1 / 01 jun 17 / Review & polish.
   v1.0.2 / 01 may 19 / Review & polish.
   v1.0.3 / 01 mar 21 / Review & polish.
   v1.0.4 / 01 dec 22 / Review & polish.
   v1.0.5 / 01 nov 24 / Review & polish.
BACK_TO_TOP
